Wednesday, December 28, 2016

TCP/UDP Protocols/Prots & important port numbers in Linux OS

TCP/UDP Protocols/Ports are ranging from 0-65535 so total we have 65536 ports & because of the limitation in TCP/IP stack where the port number field is just 16-bit (unsigned integer) size. So we have only 2^16(2 to the power of 16) ports which are equal to 65536 ports

Port "Software Port" is piece of software which is used as docking point in your machine, where remote application can interact/communicate. "Hardware Port" is a physical peripheral connecting point to a machine from a physical device. "Socket" is combination of software Port and IP address.

Port numbers are assigned in various ways, based on following three ranges:

System Ports/Well known Ports (0-1023)
User Ports (1024-49151)
and the Dynamic and/or Private Ports (49152-65535)

some important default port numbers:
********************************************
TCP===6  (TCP has it's own port number in TCP/IP stack)

UDP===17 (UDP has it's own port number in TCP/IP stack)
http/Apache===80
https===443
rsync===873
Netbios(nmbd)===137
samba(smbd)===139
ftp data transfer====20 (For transferring FTP data)
ftp data control(command)=====21  (For starting FTP connection)
telnet===23
ssh==22
sftp==22
dns==53
bootp(dhcp server)===67
dhcp client===68
tftp===69
smtp===25
snmp===161
mysql===3306
pop3===110
imap====143
imaps====993
ntp===123
samba===901
nfs====2049
kerberos====88
tftp====69
ldap===389
uucp====540
nntp===563
mysql===3306
svn====3690
X11===6000-6063 (X11 use 6000 to 6063 ports for connecting X11 from remote server)
squid===3129

You can see all the port information from /etc/services file in Linux

Below is the process about How to check that what services running on specific port with particular PID and How to kill that (Note: you must have root access to run lsof & fuser super user command )

I hope this would give more & exact idea about ports,process(PID/PPID) & protocols(TCP/UDP) as per Operating System (OS) perspective.

As a normal user you can run netstat command & find out your query output as per below screenshots (consider this just as an example for you guys)


lsof - list open files (lsof is a command meaning "list open files", which is used in many Unix-like systems to report a list of all open files and the processes that opened them.)

*****************
lsof examples:
*****************
To view the port associated with a daemon:

# lsof -i -n -P | grep sendmail
sendmail  31649    root    4u  IPv4 521738       TCP *:25 (LISTEN)

# lsof -i -n -P -U | grep -i sshd
sshd       2421      root    3u  IPv4              12545      0t0    TCP *:22 (LISTEN)
sshd       2421      root    4u  IPv6              12547      0t0    TCP *:22 (LISTEN)
sshd      10935      root    3u  IPv4              39787      0t0    TCP 127.0.0.1:22->127.0.0.1:58478 (ESTABLISHED)
sshd      10935      root    4u  unix 0xffff88008aab79c0      0t0  39843 socket
sshd      10935      root    5u  unix 0xffff88008a967080      0t0  39850 socket
sshd      31805      root    3u  IPv4             188908      0t0    TCP 172.29.76.151:22->172.29.79.185:1645 (ESTABLISHED)
sshd      31805      root    4u  unix 0xffff880107cbfcc0      0t0 189152 socket
sshd      31805      root    5u  unix 0xffff880099aa8cc0      0t0 189158 socket

From the above one can see that "sendmail" is listening on its standard port of "25" and "sshd" is listening on its standard port of "22"

Options:
========
    * -i Lists IP sockets.
    * -n Do not resolve hostnames (no DNS).
    * -P Do not resolve port names (list port number instead of its name).
    * -U This option selects the listing of UNIX domain socket files.
=========================


fuser - identify processes using files or sockets (fuser displays the PIDs of processes using the specified files or file systems.)

******************
fuser examples:
******************
# fuser -v -n tcp 80
                     USER        PID ACCESS COMMAND
80/tcp:              root       2797 F.... httpd
                     apache    17090 F.... httpd
                     apache    17091 F.... httpd
                     apache    17092 F.... httpd
                     apache    17093 F.... httpd
                     apache    17094 F.... httpd
                     apache    17095 F.... httpd
                     apache    17096 F.... httpd
                     apache    17097 F.... httpd
                     apache    17098 F.... httpd
# fuser -v -n tcp 8080
                     USER        PID ACCESS COMMAND
8080/tcp:            tomcat     2743 F.... java

#fuser -anu tcp 80
80/tcp:               2797(root) 17090(apache) 17091(apache) 17092(apache) 17093(apache) 17094(apache) 17095(apache) 17096(apache) 17097(apache) 17098(apache)

# fuser -anu tcp 8080
8080/tcp:             2743(tomcat)

Options:
========

* -k kills all process accessing a file. For example fuser -k /path/to/your/filename kills all processes accessing this directory without confirmation. Use -i for confirmation

* -i interactive mode. Prompt before killing process

* -v verbose.

* -u append username

* -a display all files


ss "socket statistics" command:
********************************
ss command is used to show socket statistics

ss -l ===> to display all open network ports
ss- s ===>to List currently established, closed, orphaned and waiting TCP sockets
ss -pl ===> to see process named using open socket
ss -pl | grep 3306 ===> to figureout who is responsible for opening socket/port # 3306
ss -t -a ==> To display all TCP sockets/ports
ss -u -a ==> To display all UDP sockets/ports

Please refer URL https://www.cyberciti.biz/tips/linux-investigate-sockets-network-connections.html to get more details regarding ss utility in Linux


ps - Displays The Processes
****************************

ps command will report a snapshot of the current processes. To select all processes use the -A or -e(entire) option:
Print All Process On The Server
# ps -A
# ps axu
#ps -ef

See Every Process Running As User John
# ps -U john -u john u

Few more commands as an example: (normal user can run below bold commands)

lsof -i:443
netstat -nlp
netstat -anlp
lsof -i | grep apache
lsof -i | grep root
lsof -i | grep 8080
lsof -i | grep -i listen
netstat -lp
netstat -anlp
lsof -i | grep -i listen
lsof -i | grep root
fuser -n tcp 8080
netstat -anpl | grep -i 8080
netstat -anp | grep -i 8080
lsof -i tcp:80
lsof -i:80
lsof -i udp:80
lsof -i udp
lsof -i tcp

about Network File System (NFS) "HARD" or "SOFT" mount in Linux OR why HARD mount is recommended for NFS in Linux

Network File System (NFS)
********************************

Hard Mount (Recommended)
=====================
If you have mounted the NFS filesystem using hard mount, it will repeatedly retry to contact the server. Once the server is back online the program will continue to execute undisturbed from the state where it was during server crash. We can use the mount option “intr” which allows NFS requests to be interrupted if the server goes down or cannot be reached. Hence the recommended settings are hard and intr options.

mount -o rw,hard,intr server1.example.com/home /nfs_share1

entry in fstab:
netapp01z:/vol/example_share  /opt/example  nfs  _netdev,vers=3,rsize=32768,wsize=32768,hard,intr,retry=20,bg 0 0

Soft Mount (Not Recommended)
========================
Suppose you have mounted a NFS filesystem using “soft mount” . When a program or application requests a file from the NFS filesystem, NFS client daemons will try to retrieve the data from the NFS server. But, if it doesn’t get any response from the NFS server (due to any crash or failure of NFS server), the NFS client will report an error to the process on the client machine requesting the file access. The advantage of this mechanism is “fast responsiveness” as it doesn’t wait for the NFS server to respond. But, the main disadvantage of this method is data corruption or loss of data. So, this is not a recommended option to use.

mount -o rw,soft server1.example.com/home /nfs_share1

hard or soft — Specifies whether the program using a file via an NFS connection should stop and wait (hard) for the server to come back online, if the host serving the exported file system is unavailable, or if it should report an error (soft).

If hard is specified, the user cannot terminate the process waiting for the NFS communication to resume unless the intr option is also specified.

If soft is specified, the user can set an additional timeo=<value> option, where <value> specifies the number of seconds to pass before the error is reported.

Note:
====
Using soft mounts is not recommended as they can generate I/O errors in very congested networks or when using a very busy server.
intr — Allows NFS requests to be interrupted if the server goes down or cannot be reached.

Monday, December 26, 2016

Editors in Linux

================
Editors in Linux
================

GUI Editors
=========
emacs
nedit
gedit


CUI/TUI Editors
============
Vi (default Unix/Linux editor)
nano
ed/ex ==> line-oriented text editors


There are three modes:
==================
command Mode
Insert Mode
Execution Mode

command mode:
********************
yy ==> to copy the line
p ==> to paste the line
"n"yy ==> to copy "n" number of lines
dd ==> to delete the line
"n" dd ==> to delete "n" number of lines
x ==> to delete the character
dw ==> to delete the word
u ==> undo
ctrl + r ==> redo
shift + r ==> replace
shift + j ==> joining the lines
/<word> ==> search for a word


Insert Mode:
***************
i ==> for insert mode


Execution Mode:
*******************
:e! ==> reedit
:w ==> write the file (save)
:q ==> quit without saving the file
:wq ==> write the file (save) & quit the file
:wq! ==> forcefully write the file (save) & quit the file
:w! ==> forcefully write the file
:q! ==> quit forcefully  
:set nu ==> to show line numbers
:set nonu ==> to show all lines without line numbers
:85 ==> go to line number 85 (:n)


for find & replace
******************
:1,$s/redhat(old string)/rhce(new string)/g (global expression)
:1,10s/redhat/rhce
:1,15d ==> deleting from line 1 to 15
:1,%d ==> deleting the entire buffer
:1,$d ==> deleting the entire buffer
:n ==> next file
:rew ==> previous (rewinding) file
:w /appl/mynewfile ==> save the file with different location with different name


you can get more details about vi editor from below utility in Linux:
***************************************************************************
#man vi
or
#vimtutor

How to resolve Yum rpmdb: PANIC issue in Linux


How to resolve Yum rpmdb: PANIC issue in Linux

[root@Server1 etc]# yum clean all

rpmdb: PANIC: fatal region error detected; run recovery
error: db3 error(-30974) from dbenv->open: DB_RUNRECOVERY: Fatal error, run database recovery
error: cannot open Packages index using db3 - (-30974)
error: cannot open Packages database in /var/lib/rpm
CRITICAL:yum.main:


Solution
=======
To resolve this issue you can remove the yum databases and then rebuild them

Login as root
#cd /var/lib/rpm
#rm __db*
#rpm --rebuilddb

Thursday, February 4, 2016

SSH access to root user in Linux

SSH access to root user in Linux
========================
Edit the /etc/ssh/sshd_config file
Change PermitRootLogin, PasswordAuthentication, ChallengeResponseAuthentication to yes and AuthorizedKeysFile     /root/.ssh/authorized_keys.
then restart ssh daemon
/etc/init.d/sshd restart
chkconfig sshd on

[root@instance-1centos67 yogeshanuvadia]# egrep -i "PermitRootLogin|PasswordAuthentication|ChallengeResponseAuthentication" /etc/ssh/sshd_config
PermitRootLogin yes
PasswordAuthentication yes
ChallengeResponseAuthentication yes
AuthorizedKeysFile     /root/.ssh/authorized_keys

Friday, June 26, 2015

How to execute/run a command from remote server in Linux/Unix

How to execute/run a command from remote server in Linux/Unix
==================================================

Syntax: 
ssh username_of_remote_server@remote_hostname/remote_hostipaddr -- <Command to execute on remote server>

ssh root@192.168.1.11 -- /sbin/ifconfig -a

How to display/list only folders/directories or only files in Linux/Unix (List all the zombie process & how to create alias)

Display/List only folders/directories or only files in Linux/Unix
===============================================

1) Display or list all directories in current location in Linux/Unix

Type the following command:

ls -ld */

ls -l | grep '^d'

ls -l | egrep '^d'

Display or list the hidden folder at current location, type the following command:

ls -ld .*/

ls -la | grep '^d'

ls -la | egrep '^d'

This command lists directories in the current path/folder: ls -d */

*/ is a pattern that matches all of the subfolders in the current folder (* would match all files and subfolders; the / restricts it to folders/directories). for e.g. to list all subfolders under /home/yogesh/, use ls -d /home/yogesh/*/


2) Display or list all files in current location in Linux/Unix

ls -l | grep -v '^d'

ls -l | egrep -v '^d'

ls -la | egrep -v '^d'


3) List all the directories at 1 Level depth in /etc including hidden folders with find command:

find /etc -maxdepth 1 -type d


4) You Can use find command to list either files or folders/directories:

The find command can be used as follows to list all directories in /etc

find /etc -type d

find /etc -type d -ls

find . -type d -ls


5) To list/see the zombie/defunct process in Linux/Unix:

pf -ef | grep -i defunct

ps -elf | grep -w Z


6) How to create alias to save the time:

alias lf="ls -ls | egrep -v '^d'"

alias ldir="ls -l | egrep '^d'"

Thursday, December 11, 2014

How to Configure DNS Server on RHEL/CentOS 5

DNS Server Configuration on RHEL/CentOS 5
*******************************************************
DNS Port:53
DNSSEC Port:953

DNS Script:    /etc/named.conf
DNS Database Files:    /var/named/chroot/var/named/localhost.zone
            /var/named/chroot/var/named/named.local

===================================================
rpm -qa bind*        (looking for rpm “bind”,” bind-utils”, “bind-devel”, “bind-libs”, “bind-chroot”)
rpm -qa caching*    (looking for rpm “caching-nameserver”)

if above rpm/packages are not available then install all above rpms via YUM
===================================================
cd /var/named/chroot/etc
cp -p named.caching-nameserver.conf named.conf
ln -s named.conf /etc/named.conf
===================================================
vi /etc/named.conf
options{
    listen-on port 53 { 192.168.10.15; };
    allow-query { 192.168.10.15; };
};
===================================================
vi /etc/named.rfc1912.zone
zone "example.com" IN {
    type master;
    file "for.zone";
};
zone "10.168.192.in-addr.arpa" IN {
    type master;
    file "rev.zone"
};
===================================================    
cd /var/named/chroot/var/named
cp -p localhost.zone for.zone
cp -p named.local rev.zone
===================================================
vi /var/named/chroot/var/named/for.zone
@     IN SOA  server1.example.com. root  (====)
    IN NS    server1.example.com.
server1        IN A    192.168.10.15
station1    IN A    192.168.10.16
station2    IN A    192.168.10.17
station3    IN A    192.168.10.18
station4    IN A    192.168.10.19
===================================================
vi /var/named/chroot/var/named/rev.zone
@     IN SOA  server1.example.com. root. (====)
IN NS    server1.example.com.
15    IN PTR    server1.example.com.
16    IN PTR    station1.example.com.
17    IN PTR    station2.example.com.
18    IN PTR    station3.example.com.
19    IN PTR    station4.example.com.
===================================================
hostname server1.example.com
vi /etc/hosts
127.0.0.1    server1.example.com  server1  localhost.localdomain 
192.168.10.15    server1.example.com  server1  localhost.localdomain 
===================================================
vi /etc/resolv.conf
search example.com
nameserver 192.168.10.15
===================================================
server named restart
chkconfig named on
===================================================
Testing:
#dig server1.example.com    (forward lookup)
QUESTION
ANSWER
AUTHORITY
#dig -x 192.168.10.15        (reverse lookup)
QUESTION
ANSWER
AUTHORITY
===================================================
Debugging Tools for DNS Server
#named-checkconf  /etc/named.conf        (if it provide next prompt then all is OK)
#named-checkzone  example.com  localhost.zone    (it must show OK)
#named-checkzone  example.com  named.zone    (it must show OK)
===================================================

How to Increase Swap Memory in Linux OS

LinuxServer1 & LinuxServer2
***************************

swapoff -av /dev/vg00/swapvol

swapon -s

lvresize /dev/vg00/swapvol -L 32G

mkswap /dev/vg00/swapvol

swapon -va

free -tg

==============================================
bash-3.2# hostname
LinuxServer1
bash-3.2# swapoff -av /dev/vg00/swapvol
swapoff on /dev/vg00/swapvol
bash-3.2# swapon -s
bash-3.2# lvresize /dev/vg00/swapvol -L 32G
  Extending logical volume swapvol to 32.00 GB
  Logical volume swapvol successfully resized
bash-3.2# mkswap /dev/vg00/swapvol
Setting up swapspace version 1, size = 34359734 kB
bash-3.2# swapon -va
swapon on /dev/vg00/swapvol
bash-3.2# swapon -s
Filename                                Type            Size    Used    Priority
/dev/mapper/vg00-swapvol                partition       33554424        0       -2
bash-3.2# free -tg
             total       used       free     shared    buffers     cached
Mem:           251          1        249          0          0          0
-/+ buffers/cache:          0        251
Swap:           31          0         31
Total:         283          1        281
bash-3.2# free -tm
             total       used       free     shared    buffers     cached
Mem:        257565       1694     255870          0        245        956
-/+ buffers/cache:        493     257071
Swap:        32767          0      32767
Total:      290333       1694     288638
bash-3.2#
=================================================
bash-3.2# swapoff -av /dev/vg00/swapvol
swapoff on /dev/vg00/swapvol
bash-3.2# swapon -s
bash-3.2# lvresize /dev/vg00/swapvol -L 4G
  /dev/hda: open failed: No medium found
  Extending logical volume swapvol to 4.00 GB
  Logical volume swapvol successfully resized
bash-3.2# mkswap /dev/vg00/swapvol
Setting up swapspace version 1, size = 4294963 kB
bash-3.2# swapon -va
swapon on /dev/vg00/swapvol
bash-3.2# free -tg
             total       used       free     shared    buffers     cached
Mem:             3          3          0          0          0          2
-/+ buffers/cache:          0          2
Swap:            3          0          3
Total:           7          3          4
bash-3.2# free -tm
             total       used       free     shared    buffers     cached
Mem:          3775       3753         21          0        146       2672
-/+ buffers/cache:        933       2841
Swap:         4095          0       4095
Total:        7871       3753       4117
bash-3.2#

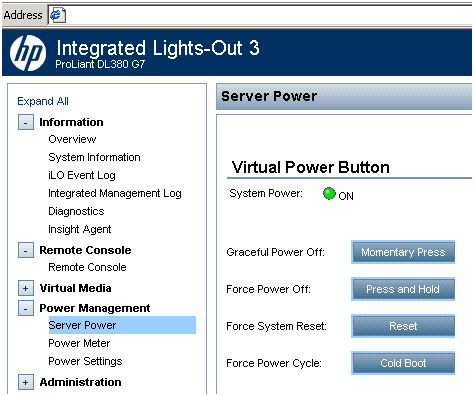
HP Integrated Lights-Out 3 Virtual Power Button


  • Momentary Press button provides behavior identical to pressing the physical power button.
  • Press and Hold is identical to pressing the physical power button for five seconds and then releasing it. This option provides the ACPI-compatible functionality that is implemented by some operating systems. These operating systems behave differently depending upon a short press or long press. The behavior of this option might circumvent any graceful shutdown features of the operating system.
  • Cold Boot of the system immediately removes power from the system. The system will restart after approximately six seconds. This option is not available when the server is powered down. This option circumvents graceful operating system shutdown features.
  • Reset System initiates a system reset. This option is not available when the server is powered down. The behavior of this option might circumvent any graceful shutdown features of the operating system. 

How to protect a directory in Apache on Linux

Set Apache Password Protected Directories With .htaccess File

There are many ways you can password protect directories under Apache web server. This is important to keep your file privates from both unauthorized users and search engines .Here you will see the basics of password protecting a directory on your server. You can use any one of the following method:
  1. Putting authentication directives in a <Directory> section, in your main server configuration httpd.conf file, is the preferred way to implement this kind of authentication.
  2. If you do not have access to Apache httpd.conf file (for example shared hosting) then with the help of file called .htaccess you can create password protect directories. .htaccess file provide a way to make configuration changes on a per-directory basis.
In order to create apache password protected directories you need:
  • Password file
  • And Directory name which you would like to password protect (/var/www/docs)

Step # 1: Make sure Apache is configured to use .htaccess file

You need to have AllowOverride AuthConfig directive in httpd.conf file in order for these directives to have any effect. Look for DocumentRoot Directory entry. In this example, our DocumentRoot directory is set to /var/www. Therefore, my entry in httpd.conf looks like as follows:
<Directory /var/www>
Options Indexes Includes FollowSymLinks MultiViews
AllowOverride AuthConfig
Order allow,deny
Allow from all
</Directory>
Save the file and restart Apache
If you are using Red Hat /Fedora Linux:

# service httpd restart
If you are using Debian Linux:
# /etc/init.d/apache-perl restart

Step # 2: Create a password file with htpasswd

htpasswd command is used to create and update the flat-files (text file) used to store usernames and password for basic authentication of Apache users. General syntax:
htpasswd -c password-file username

Where,
  • -c : Create the password-file. If password-file already exists, it is rewritten and truncated.
  • username : The username to create or update in password-file. If username does not exist in this file, an entry is added. If it does exist, the password is changed.
Create directory outside apache document root, so that only Apache can access password file. The password-file should be placed somewhere not accessible from the web. This is so that people cannot download the password file:
# mkdir -p /home/secure/
Add new user called testuser
# htpasswd -c /home/secure/apasswords testuser
Make sure /home/secure/apasswords file is readable by Apache web server. If Apache cannot read your password file, it will not authenticate you. You need to setup a correct permission using chown command. Usually apache use www-data user. Use the following command to find out Apache username. If you are using Debian Linux use pache2.conf, type the following command:
# grep -e '^User' /etc/apache2/apache2.conf
Output:
www-data
Now allow apache user www-data to read our password file:
# chown www-data:www-data /home/secure/apasswords
# chmod 0660 /home/secure/apasswords
If you are using RedHat and Fedora core, type the following commands :
# grep -e '^User' /etc/httpd/conf/httpd.conf
Output:
apache
Now allow apache user apache to read our password file:
# chown apache:apache /home/secure/apasswords
# chmod 0660 /home/secure/apasswords
Now our user testuser is added but you need to configure the Apache web server to request a password and tell the server which users are allowed access. Let us assume you have directory called /var/www/docs and you would like to protect it with a password.
Create a directory /var/www/docs if it does not exist:
# mkdir -p /var/www/docs
Create .htaccess file using text editor:
# cd /var/www/docs
# vi .htaccess
Add following text:
AuthType Basic
AuthName "Restricted Access"
AuthUserFile /home/secure/apasswords
Require user testuser
Save file and exit to shell prompt.

Step # 3: Test your configuration

Fire your browser type url http://yourdomain.com/docs/ or http://localhost/docs/ or http://ip-address/docs


When prompted for username and password please supply username testuser and password. You can add following lines to any file <Diretory> entry in httpd.conf file:

AuthType Basic
AuthName "Restricted Access"
AuthUserFile /home/secure/apasswords
Require user testuser
To change or setup new user use htpasswd command again.

Troubleshooting

If password is not accepted or if you want to troubleshoot authentication related problems, open and see apache access.log/error.log files:
Fedora Core/CentOS/RHEL Linux log file location:
# tail -f /var/log/httpd/access_log
# tail -f /var/log/httpd/error_log

Debian Linux Apache 2 log file location:
# tailf -f /var/log/apache2/access.log
# tailf -f /var/log/apache2/error.log

How to Create extra root user account in Linux

Create extra root user account in Linux
********************************
vi /etc/sudoers
testuser ALL=(ALL) NOPASSWD: ALL
*************
after this still we have to use sudo like: (or jst do sudo -s)
#sudo <superuser command>
*************
#usermod -o -u 0 -g 0 <user_name>
*************
#adduser -u 0 -o -g 0 -G 0,1,2,3,4,6,10 -M root2
*************


How to Enable the "root" Account on CentOS or Mac OS X
#sudo passwd root
Enter Password: Changing password for root
New password: Verify password:

How to protect files & folders with password in Linux

only for file protection
gpg  –c  abc.tar
gpg abc.tar

protection for file & Folder both 
zip  –e  -r  <dir name>   <zip dir name which must be same as dir name> 
zip  -e  -r  yy yy
unzip –a yy.zip

Hide a file or folder in Linux
=========================
Just rename the file or folder with prefix dot i.e
Eg:

File name or folder name is hello
#mv  hello  .hello

**********************************************************************

You can password protect a zip file. Proceed as follows:

Create a directory for this experiment, and name it test.
Copy a few files and paste them into this directory so it isn't empty.
Now open a terminal and enter:
$ zip -e -r test test
Enter password:
Verify password:
Delete the directory test.

Now you have a file test.zip which is password protected.

zip with -e option encrypts the contents of the zip archive using a password. This encrypts with standard pkzip encryption which is considered weak.

However, the job of protecting the file is done, because even the root user needs the password to decrypt.

Linux NIC Teaming or NIC Bonding

Linux NIC Teaming or NIC Bonding
*******************************

[root@node1 ~]# cat /etc/modprobe.d/modprobe.conf
alias eth0 e1000
alias eth1 e1000
alias eth2 e1000
alias eth3 e1000
alias bond0 bonding
options bond0 max_bonds=2 miimon=100 mode=1
alias bond1 bonding
options bond1 max_bonds=2 miimon=100 mode=1
[root@node1 ~]# cat /etc/sysconfig/network-scripts/ifcfg-bond0
DEVICE=bond0
IPADDR=192.168.1.11
NETMASK=255.255.255.0
BOOTPROTO=static
ONBOOT=yes
USERCTL=no
IPV6INIT=no
[root@node1 ~]# cat /etc/sysconfig/network-scripts/ifcfg-bond1
DEVICE=bond1
IPADDR=172.24.1.11
NETMASK=255.255.0.0
BOOTPROTO=static
ONBOOT=yes
USERCTL=no
IPV6INIT=no
[root@node1 ~]# cat /etc/sysconfig/network-scripts/ifcfg-eth0
# Intel Corporation 82540EM Gigabit Ethernet Controller
DEVICE=eth0
BOOTPROTO=static
HWADDR=08:00:27:EA:1C:EC
MASTER=bond0
SLAVE=yes
ONBOOT=yes
USERCTL=no
[root@node1 ~]# cat /etc/sysconfig/network-scripts/ifcfg-eth1
# Intel Corporation 82540EM Gigabit Ethernet Controller
DEVICE=eth1
BOOTPROTO=static
HWADDR=08:00:27:12:A1:28
MASTER=bond1
SLAVE=yes
ONBOOT=yes
USERCTL=no
[root@node1 ~]# cat /etc/sysconfig/network-scripts/ifcfg-eth2
# Intel Corporation 82540EM Gigabit Ethernet Controller
DEVICE=eth2
BOOTPROTO=static
HWADDR=08:00:27:32:CD:DE
MASTER=bond0
SLAVE=yes
ONBOOT=yes
USERCTL=no
[root@node1 ~]# cat /etc/sysconfig/network-scripts/ifcfg-eth3
# Intel Corporation 82540EM Gigabit Ethernet Controller
DEVICE=eth3
BOOTPROTO=static
HWADDR=08:00:27:EE:C4:38
MASTER=bond1
SLAVE=yes
ONBOOT=yes
USERCTL=no
[root@node1 ~]# mii-tool
eth0: no autonegotiation, 100baseTx-FD, link ok
eth1: no autonegotiation, 100baseTx-FD, link ok
eth2: no autonegotiation, 100baseTx-FD, link ok
eth3: no autonegotiation, 100baseTx-FD, link ok
[root@node1 ~]# ifconfig -a
bond0     Link encap:Ethernet  HWaddr 08:00:27:EA:1C:EC
          inet addr:192.168.1.11  Bcast:192.168.1.255  Mask:255.255.255.0
          inet6 addr: fe80::a00:27ff:feea:1cec/64 Scope:Link
          UP BROADCAST RUNNING MASTER MULTICAST  MTU:1500  Metric:1
          RX packets:2473 errors:0 dropped:0 overruns:0 frame:0
          TX packets:1645 errors:0 dropped:0 overruns:0 carrier:0
          collisions:0 txqueuelen:0
          RX bytes:236857 (231.3 KiB)  TX bytes:219985 (214.8 KiB)

bond1     Link encap:Ethernet  HWaddr 08:00:27:12:A1:28
          inet addr:172.24.1.11  Bcast:172.24.255.255  Mask:255.255.0.0
          inet6 addr: fe80::a00:27ff:fe12:a128/64 Scope:Link
          UP BROADCAST RUNNING MASTER MULTICAST  MTU:1500  Metric:1
          RX packets:581 errors:0 dropped:0 overruns:0 frame:0
          TX packets:53 errors:0 dropped:0 overruns:0 carrier:0
          collisions:0 txqueuelen:0
          RX bytes:60072 (58.6 KiB)  TX bytes:7215 (7.0 KiB)

eth0      Link encap:Ethernet  HWaddr 08:00:27:EA:1C:EC
          UP BROADCAST RUNNING SLAVE MULTICAST  MTU:1500  Metric:1
          RX packets:2243 errors:0 dropped:0 overruns:0 frame:0
          TX packets:1663 errors:0 dropped:0 overruns:0 carrier:0
          collisions:0 txqueuelen:1000
          RX bytes:215657 (210.6 KiB)  TX bytes:222773 (217.5 KiB)

eth1      Link encap:Ethernet  HWaddr 08:00:27:12:A1:28
          UP BROADCAST RUNNING SLAVE MULTICAST  MTU:1500  Metric:1
          RX packets:346 errors:0 dropped:0 overruns:0 frame:0
          TX packets:53 errors:0 dropped:0 overruns:0 carrier:0
          collisions:0 txqueuelen:1000
          RX bytes:38572 (37.6 KiB)  TX bytes:7215 (7.0 KiB)

eth2      Link encap:Ethernet  HWaddr 08:00:27:EA:1C:EC
          UP BROADCAST RUNNING SLAVE MULTICAST  MTU:1500  Metric:1
          RX packets:235 errors:0 dropped:0 overruns:0 frame:0
          TX packets:0 errors:0 dropped:0 overruns:0 carrier:0
          collisions:0 txqueuelen:1000
          RX bytes:21500 (20.9 KiB)  TX bytes:0 (0.0 b)

eth3      Link encap:Ethernet  HWaddr 08:00:27:12:A1:28
          UP BROADCAST RUNNING SLAVE MULTICAST  MTU:1500  Metric:1
          RX packets:235 errors:0 dropped:0 overruns:0 frame:0
          TX packets:0 errors:0 dropped:0 overruns:0 carrier:0
          collisions:0 txqueuelen:1000
          RX bytes:21500 (20.9 KiB)  TX bytes:0 (0.0 b)

lo        Link encap:Local Loopback
          inet addr:127.0.0.1  Mask:255.0.0.0
          inet6 addr: ::1/128 Scope:Host
          UP LOOPBACK RUNNING  MTU:16436  Metric:1
          RX packets:1770 errors:0 dropped:0 overruns:0 frame:0
          TX packets:1770 errors:0 dropped:0 overruns:0 carrier:0
          collisions:0 txqueuelen:0
          RX bytes:2020795 (1.9 MiB)  TX bytes:2020795 (1.9 MiB)

sit0      Link encap:IPv6-in-IPv4
          NOARP  MTU:1480  Metric:1
          RX packets:0 errors:0 dropped:0 overruns:0 frame:0
          TX packets:0 errors:0 dropped:0 overruns:0 carrier:0
          collisions:0 txqueuelen:0
          RX bytes:0 (0.0 b)  TX bytes:0 (0.0 b)

[root@node1 ~]#modprobe bonding
[root@node1 ~]#service network restart
[root@node1 ~]# cat /proc/net/bonding/bond0
Ethernet Channel Bonding Driver: v3.4.0 (October 7, 2008)

Bonding Mode: fault-tolerance (active-backup)
Primary Slave: None
Currently Active Slave: eth0
MII Status: up
MII Polling Interval (ms): 100
Up Delay (ms): 0
Down Delay (ms): 0

Slave Interface: eth0
MII Status: up
Link Failure Count: 0
Permanent HW addr: 08:00:27:ea:1c:ec

Slave Interface: eth2
MII Status: up
Link Failure Count: 0
Permanent HW addr: 08:00:27:32:cd:de
[root@node1 ~]# cat /proc/net/bonding/bond1
Ethernet Channel Bonding Driver: v3.4.0 (October 7, 2008)

Bonding Mode: fault-tolerance (active-backup)
Primary Slave: None
Currently Active Slave: eth1
MII Status: up
MII Polling Interval (ms): 100
Up Delay (ms): 0
Down Delay (ms): 0

Slave Interface: eth1
MII Status: up
Link Failure Count: 0
Permanent HW addr: 08:00:27:12:a1:28

Slave Interface: eth3
MII Status: up
Link Failure Count: 0
Permanent HW addr: 08:00:27:ee:c4:38
[root@node1 ~]#


add following lines to file
#vim /etc/sysctl.conf
# Gigabit tuning
net.core.rmem_max = 16777216
net.core.wmem_max = 16777216
# net.core.wmem_max = 8388608
net.ipv4.tcp_window_scaling = 1
net.ipv4.tcp_rmem = 4096 87380 16777216
net.ipv4.tcp_wmem = 2096 65535 16777216

net.ipv4.tcp_mem = 98304 131072 196608
net.core.netdev_max_backlog = 250000
net.ipv4.tcp_timestamps = 1
net.ipv4.ip_local_port_range = 1025 61000

# VM pressure fixes
vm.swappiness = 100
vm.inactive_clean_percent = 100

vm.pagecache = 200 10 20
vm.dirty_ratio = 10
vm.dirty_background_ratio = 5


# Security tweaks
net.ipv4.tcp_synack_retries = 3
net.ipv4.tcp_tw_recycle = 1
net.ipv4.tcp_max_syn_backlog = 10240
net.ipv4.tcp_fin_timeout = 30

net.ipv4.tcp_keepalive_time = 1200


What is bonding?
Bonding is the same as port trunking. In the following I will use the word bonding because practically we will bond interfaces as one.

But still...what is bonding?
Bonding allows you to aggregate multiple ports into a single group, effectively combining the bandwidth into a single connection. Bonding also allows you to create multi-gigabit pipes to transport traffic through the highest traffic areas of your network. For example, you can aggregate three megabits ports (1 mb each) into a three-megabits trunk port. That is equivalent with having one interface with three megabits speed.

Where should I use bonding?
You can use it wherever you need redundant links, fault tolerance or load balancing networks. It is the best way to have a high availability network segment. A very useful way to use bonding is to use it in connection with 802.1q VLAN support (your network equipment must have 802.1q protocol implemented).

The best documentation is on the Linux Channel Bonding Project page
I strongly recommend to read it for more details.

Credits: Linux Channel Bonding Project page , Thea

This small howto will try to cover the most used bonding types. The following script (the gray area) will configure a bond interface (bond0) using two ethernet interface (eth0 and eth1). You can place it onto your on file and run it at boot time..

#!/bin/bash

modprobe bonding mode=0 miimon=100 # load bonding module

ifconfig eth0 down # putting down the eth0 interface
ifconfig eth1 down # putting down the eth1 interface

ifconfig bond0 hw ether 00:11:22:33:44:55 # changing the MAC address of the bond0 interface
ifconfig bond0 192.168.55.55 up # to set ethX interfaces as slave the bond0 must have an ip.

ifenslave bond0 eth0 # putting the eth0 interface in the slave mod for bond0
ifenslave bond0 eth1 # putting the eth1 interface in the slave mod for bond0

You can set up your bond interface according to your needs. Changing one parameters (mode=X) you can have the following bonding types:
mode=0 (balance-rr)
Round-robin policy: Transmit packets in sequential order from the first available slave through the last. This mode provides load balancing and fault tolerance.

mode=1 (active-backup)
Active-backup policy: Only one slave in the bond is active. A different slave becomes active if, and only if, the active slave fails. The bond's MAC address is externally visible on only one port (network adapter) to avoid confusing the switch. This mode provides fault tolerance. The primary option affects the behavior of this mode.

mode=2 (balance-xor)
XOR policy: Transmit based on [(source MAC address XOR'd with destination MAC address) modulo slave count]. This selects the same slave for each destination MAC address. This mode provides load balancing and fault tolerance.

mode=3 (broadcast)
Broadcast policy: transmits everything on all slave interfaces. This mode provides fault tolerance.

mode=4 (802.3ad)
IEEE 802.3ad Dynamic link aggregation. Creates aggregation groups that share the same speed and duplex settings. Utilizes all slaves in the active aggregator according to the 802.3ad specification.

Pre-requisites:
1. Ethtool support in the base drivers for retrieving
the speed and duplex of each slave.
2. A switch that supports IEEE 802.3ad Dynamic link
aggregation.
Most switches will require some type of configuration
to enable 802.3ad mode.

mode=5 (balance-tlb)
Adaptive transmit load balancing: channel bonding that does not require any special switch support. The outgoing traffic is distributed according to the current load (computed relative to the speed) on each slave. Incoming traffic is received by the current slave. If the receiving slave fails, another slave takes over the MAC address of the failed receiving slave.

Prerequisite:
Ethtool support in the base drivers for retrieving the
speed of each slave.

mode=6 (balance-alb)
Adaptive load balancing: includes balance-tlb plus receive load balancing (rlb) for IPV4 traffic, and does not require any special switch support. The receive load balancing is achieved by ARP negotiation. The bonding driver intercepts the ARP Replies sent by the local system on their way out and overwrites the source hardware address with the unique hardware address of one of the slaves in the bond such that different peers use different hardware addresses for the server.

The most used are the first four mode types...

Also you can use multiple bond interface but for that you must load the bonding module as many as you need.
Presuming that you want two bond interface you must configure the /etc/modules.conf as follow:

alias bond0 bonding
options bond0 -o bond0 mode=0 miimon=100
alias bond1 bonding
options bond1 -o bond1 mode=1 miimon=100

Notes:

* To restore your slaves MAC addresses, you need to detach them from the bond (`ifenslave -d bond0 eth0'). The bonding driver will then restore the MAC addresses that the slaves had before they were enslaved.
* The bond MAC address will be the taken from its first slave device.
* Promiscous mode: According to your bond type, when you put the bond interface in the promiscous mode it will propogates the setting to the slave devices as follow:
o for mode=0,2,3 and 4 the promiscuous mode setting is propogated to all slaves.
o for mode=1,5 and 6 the promiscuous mode setting is propogated only to the active slave.
For balance-tlb mode the active slave is the slave currently receiving inbound traffic, for balance-alb mode the active slave is the slave used as a "primary." and for the active-backup, balance-tlb and balance-alb modes, when the active slave changes (e.g., due to a link failure), the promiscuous setting will be propogated to the new active slave.

RHEL/CentOS 6 Bonding

Bonding

Bonding (also known as “Ethernet bonding”) is a computer networking arrangement in which two or more network interfaces on a host computer are combined for redundancy or increased throughput.
mode=0 (Balance-rr) – This mode provides load balancing and fault tolerance.
mode=1 (active-backup) – This mode provides fault tolerance.
mode=2 (balance-xor) – This mode provides load balancing and fault tolerance.
mode=3 (broadcast) – This mode provides fault tolerance.
mode=4 (802.3ad) – This mode provides load balancing and fault tolerance.
mode=5 (balance-tlb) – Prerequisite: Ethtool support in the base drivers for retrieving the speed of each slave.
mode=6 (Balance-alb) – Prerequisite: Ethtool support in the base drivers for retrieving the speed of each slave.

Note: Always append extra configuration in case of a rollback.

Configuring  Bonding

# cd /etc/sysconfig/network-scripts/
# vi ifcfg-bond0
1
2
3
4
5
6
7
8
9
10
DEVICE=bond0
USERCTL=no
BOOTPROTO=none
ONBOOT=yes
IPADDR=10.0.0.10
NETMASK=255.255.0.0
NETWORK=10.0.0.0
 
TYPE=Unknown
IPV6INIT=no
# vi ifcfg-eth0
1
2
3
4
5
6
DEVICE=eth0
BOOTPROTO=none
ONBOOT=yes
MASTER=bond0
SLAVE=yes
USERCTL=no
# vi ifcfg-eth1
1
2
3
4
5
6
DEVICE=eth1
BOOTPROTO=none
ONBOOT=yes
MASTER=bond0
SLAVE=yes
USERCTL=no
# vi ifcfg-eth2
1
2
3
4
5
6
DEVICE=eth2
BOOTPROTO=none
ONBOOT=yes
MASTER=bond0
SLAVE=yes
USERCTL=no
Due to the fact that /etc/modprobe.conf has been deprecated in RedHat / CentOS 6, the process of bonding network interfaces has changed a bit.
Now instead of defining your bond in your /etc/modprobe.conf, you define it in /etc/modprobe.d/bonding.conf
# vi /etc/modprobe.d/bonding.conf
We’ll be using mode=6 (Balance-alb)
Append the following onto the end out your modprobe config file
1
2
alias bond0 bonding
options bond0 mode=6 miimon=100
# servive network restart

TCP/UDP Protocols/Prots & important port numbers in Linux OS

TCP/UDP Protocols/Ports are ranging from 0-65535 so total we have 65536 ports & because of the limitation in TCP/IP stack where the por...